Is that 3 word clutter making your blood boil? Then why u no remove it?
Last week I wrote a tutorial on removing the navigation bar in blogger blogs, which too, is nothing but a mess to your blog. In this post I'm gonna help you removing the 'Powered by Blogger' attribution from the footer section of your blog.
 In default templates and some of the custom templates, the attribution stay locked at a fixed position which is really infuriating. You can't move it, you can't delete and you go mad about that crap. Chillax, cool up your brain, and read this post. It's all up here.
 Now there a question comes that — Is it legal to remove the attribution from a blog? Because, it's kind of right of Blogger to place that stuff. Isn't it? Here's a way to deal with it. If you're using a custom template, then there must be a space in the footer to display the template maker's credits, right? In that space, beside the credits, you can place a link to Blogger saying - Hosted on Blogger or Powered by Blogger or any cool words you like.
So for now, I'm gonna remove that attribution by the following processes. First one is a bit easy for everyone. It's for the lazy peoples like mine. If you are a #hardworking kind of person, then try the 2nd process.
Tip: Before starting the following process first of all backup your template to avoid any accidental damage.
The Lazy Process:
As per as the name, it's too easy and needs no coding knowledge. All you have to do is nothing but some mouse clicks and few key presses :P
1. First Login to your blogger account and go to any of your blog.
- Don't Miss: How to Increase Blog Traffic: 8 Killer Tactics!
2. There look for the Template section and navigate to it. In the template area, you'd notice a smaller version of your blog in a frame. Click on the Customise button underneath that.
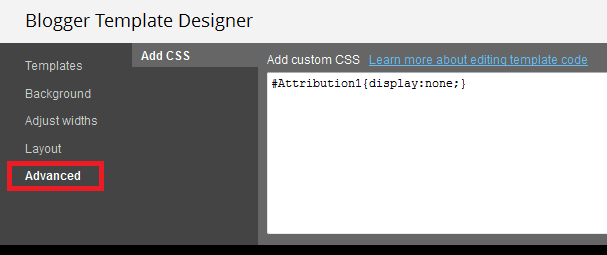
3. After clicking, a page will open namely, Blogger Template Designer. Head over to the Advanced tab there. And put the following line of code up there —
#Attribution1{display:none;}
Here's what it'd look like.
4. Next click on Apply to Blog at the right corner of that page. That's it. Now go check your blog whether the mission is succeeded or not. If it doesn't work try the second process.
- Recommended for Beginners: How and why switch to a custom template?
The #Hardworking People's Process:
Sometimes the lazy process fails to work accurately. In that case you might have to upgrade yourself to a #hardworking people :D. Anyway, back to the business.
1. First off head over to the Template section of your blog.
2. Now click on Edit Template beside the Customise button. In case you don't find it refer to the first screen shot.
- Also Read: How to Get Backlinks: The Ultimate Guide!
3. Then click on the box in middle (that has a bunch of "alien technological" codings).
4. After that look for this code -
]]></b:skin>
Tips on How to Find a Code: Simply press Ctrl+F. Then a box will be popped at the right top corner of the main coding box. Paste the code in it and hit enter. Then the text will be highlighted in yellow color, if it exists in that template.
Must See: What is SEO: The Beginner's guide.
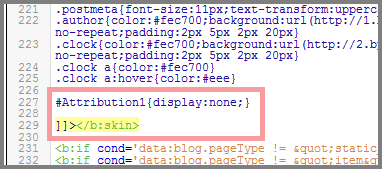
5. Found the code? Alright, now paste the following code above ]]></b:skin>.
#Attribution1{display:none;}
After pasting it would look like the screenshot below.
6. At last click on Save Template and wait until it gets saved. And then head over to your blog and dance with enjoyment for that success — not grand, yet awesome.
- Trending Hot: How to Write a Blog Post: The Ultimate Guide!
Lastly:
So now you have removed the powered by blogger attribution from your blog. But I strongly recommend to giving an attribution link to Blogger at the credit section of your blog. Because they deserve one.
Here's a question for ya. Should we remove the attribution or not? If yes, why? Share your views in the comments.
Anyway did you like the post? Then don't forget to share this to your friends, boyfriend / girlfriend (s), colleagues.
Thanks for tolerating me, see you in the comments.
Photo Credit: Ningmilo via Freedigitalphotos.net.


